
Bosch Smart Home

Twinguard Starter SetInstruction Manual
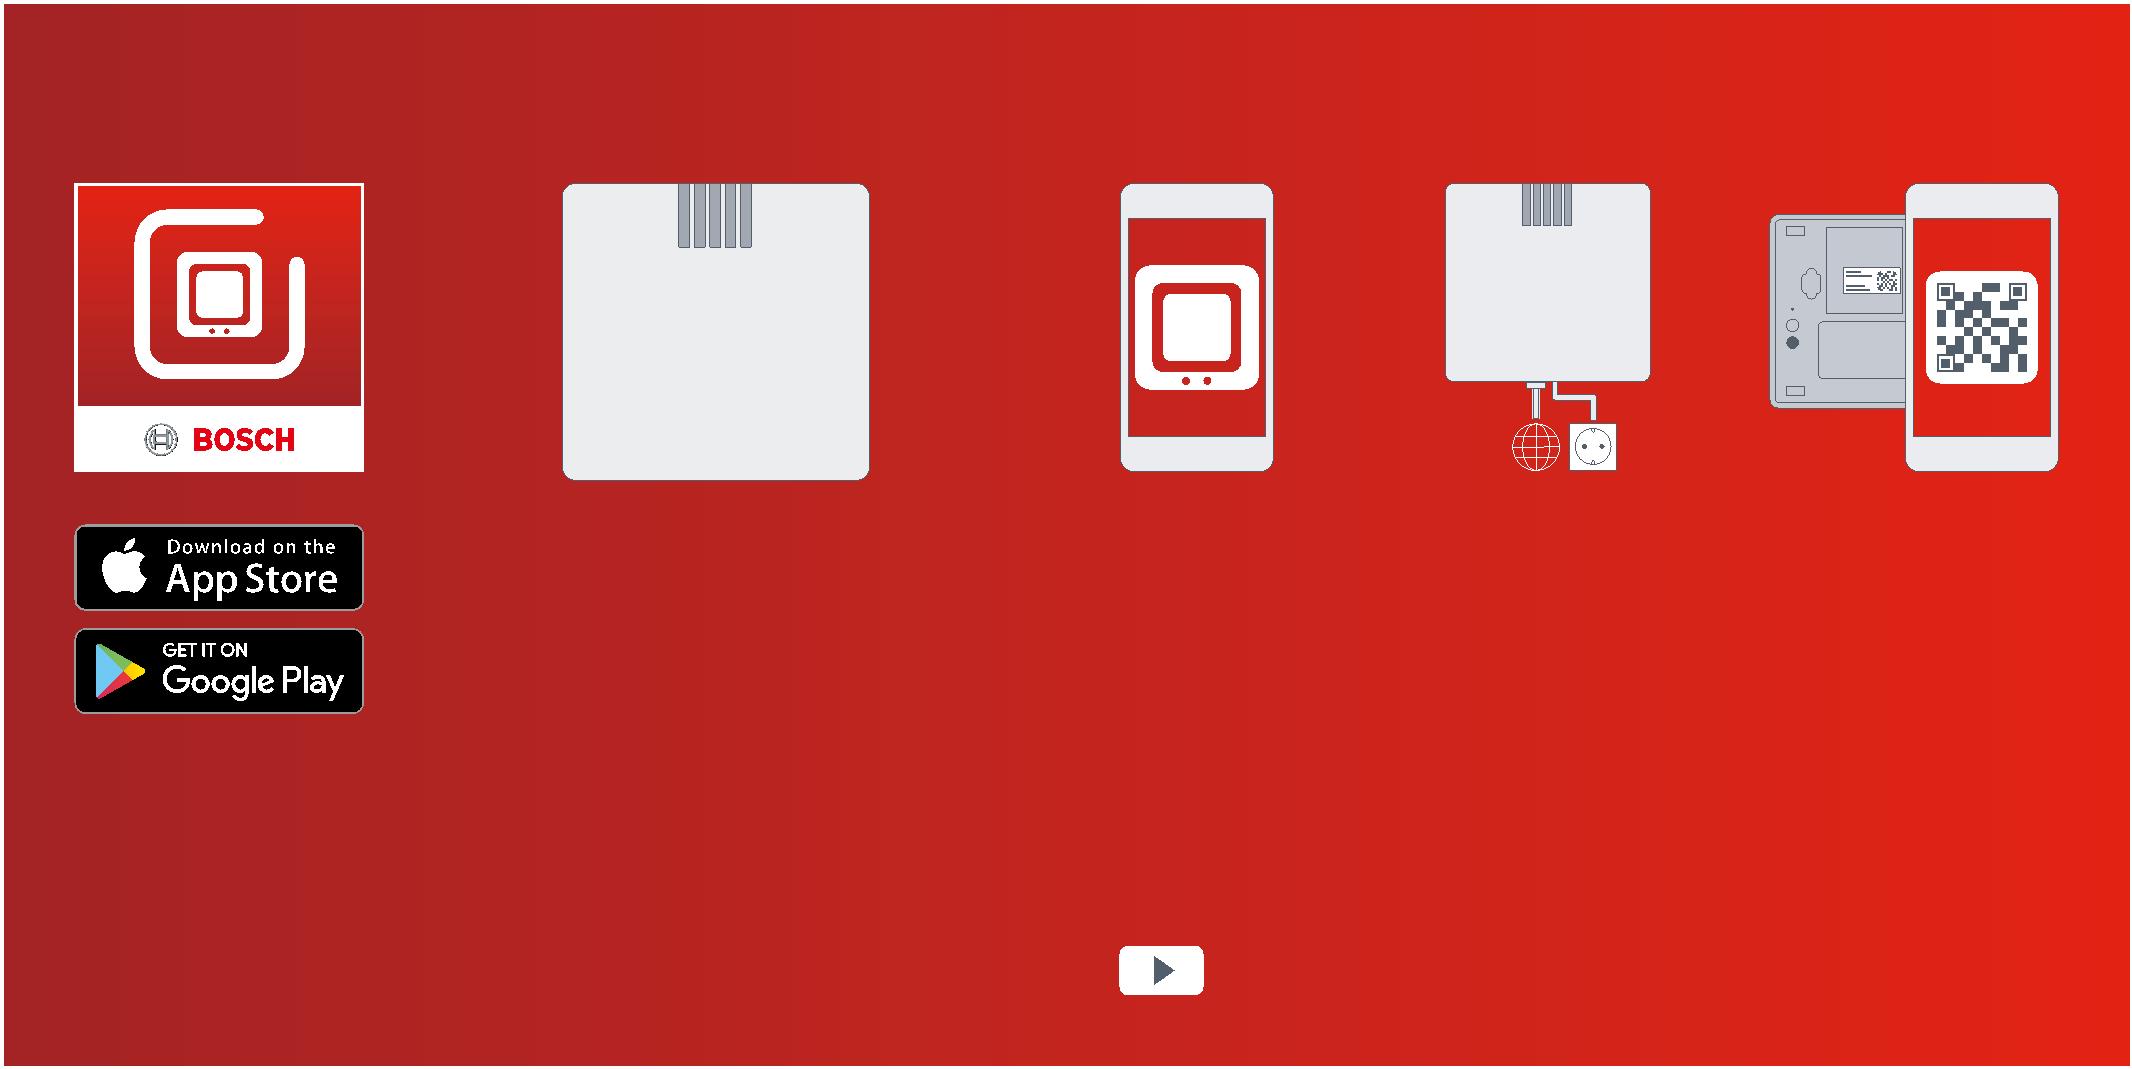
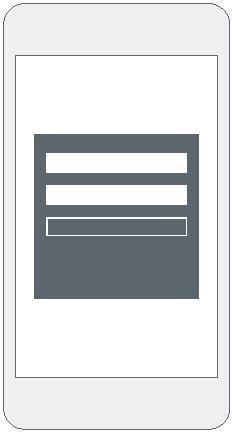
Start making your home smart! Set up your product in just three steps
|
Before you start you need to make sure you have installed the Bosch Twinguard App. You also need to make sure that you have a spare LAN port on your WiFi router. |
▶ Start the Bosch Twinguard App |
▶ Connect the Gate- way to the power supply and WiFi router |
▶ Scan the QR code on the back of the Gateway. Add the Twinguard using the QR code. |
Make sure that you download theBosch Twinguard App.
You can also watch easy to follow installation videos on our website: www.bosch-smarthome.com/installation
Dear customer,

Congratulations on purchasing your Bosch Smart Home Twinguard Starter Set.It will help you to make your home even safer and smarter.
The Twinguard Smoke Alarm can do more than just detect smoke. Its integratedLED lights up the escape route in case of an emergency. An air quality sensormeasures not only room temperature, but also relative humidity and volatileorganic compounds (VOC) of the air. The Gateway enables you to interconnectmultiple Twinguard Smoke Alarms, while the Bosch Twinguard App enables youto conveniently view their status on your mobile. You can therefore reassureyourself that everything is OK at home, no matter where you are.
We hope you enjoy your new product,The Bosch Smart Home team
5
TABLE OF CONTENTS
|
1.0 Product description…………….08 1.1 Intended use ……………………….. 12 2.0 In the box……………………………14 2.1 Gateway ……………………………… 14 2.2 Twinguard …………………………… 16 3.0 Warning notices ………………….18 3.1 Explanation of symbols …………. 18 3.2 Safety instructions……………….. 19 |
4.0 Indicators and controls……….20 4.1 Gateway product overview…….. 20 4.2 Twinguard product overview….. 24 5.0 Installation and set up the Gateway………………………..28 5.1 Starting the Bosch Twinguard App …………………….. 30 5.2 Set up the Gateway ………………. 32 5.3 Activating the Gateway………….. 34 6.0 Installation and set up the Twinguard……………………..35 6.1 Activating the Twinguard……….. 36 |
7.0 Fixing the Gateway ……………..37 7.1 Mounting instructions…………… 37 7.2 Wall mounting ……………………… 38 8.0 Fixing the Twinguard …………..40 8.1 Mounting instructions…………… 40 8.2 Fixing with screws………………… 46 9.0 Maintenance instructions ……48 9.1 Visual inspection…………………..49 9.2 Twinguard functional test………. 50 |
10.0 Alarm and troubleshooting ………………..52 10.1 Gateway faults…………………… 52 10.2 Twinguard faults ………………… 53 10.3 Switching off the Smoke Alarm ……………………………….. 54 11.0 Product details …………………55 11.1 Technical data……………………. 55 11.2 Declaration of conformity……. 57 11.3 Faults in radio operation……… 58 11.4 Open-source software………… 58 11.5 Environmental protection and disposal ……………………… 61 |
12.0 Further information…………..62
6 7
1.0 PRODUCT DESCRIPTION
|
The Twinguard Starter Set contains a Twinguard Smoke Alarm and a Gateway. The Twinguard Gateway including accessories is a Smoke Alarm manu- factured to EN 14604: 2005/AC: 2008 which connects wirelessly to a Gate- way. It is equipped with the following functions and components: |
The product reliably warns you of potential fires in your home. If smoke is detected both a visual and audible alarm is triggered. |
The Gateway connects your Twinguard to the internet and other Twinguards you might have in your home. The Gateway includes: ▶ LED signal lights ▶ Activation button on the back of the Gateway ▶ Power cable ▶ Network cable |
The Gateway has the following functions: ▶ It triggers alarms on all Twinguard Smoke Alarms connected to the Gateway if a potential fire is detect- ed ▶ It forwards alarm notifications to your mobile device through the internet |
▶ Audible alarm
▶ 360° light strip for visual signals▶ Radio module
▶ Alarm LED
▶ Emergency lighting▶ Air quality sensor▶ Smoke sensor
▶ Large operating button▶ Batteries
8 9
       |
The Gateway must be set up before the Smoke Alarms! |
Your mobile device must be on and connected to the internet in order for you to receive warnings and information from your Twinguard Smoke Alarm. |
||
|
The forwarding of alarms from alarm to alarm and to mobile devices will only work when the Gateway is switched on. Up to 40 Twinguard Smoke Alarms can be connected to one Gateway. |
You can find more detailed information about your products and how best to use them at: www.bosch-smarthome.com |
|||
10 11
1.1 Intended use

|
The product is intended for indoor use in residential buildings. It should only be used together with original Bosch Smart Home components. |
▶ Follow the safety instructions and the directions in this manual and the Bosch Twinguard App to ensure that the product is set up correctly ▶ Observe the connection conditions, ambient temperatures and humidity limits in the Technical Data section (see p. 55) ▶ Avoid installing in areas prone to high amounts of direct sunlight or near to sources of heat or cold |
Do not modify the product in any way. Any other use is consideredunintended use. We will not assume liability for any resulting damage.
12 13
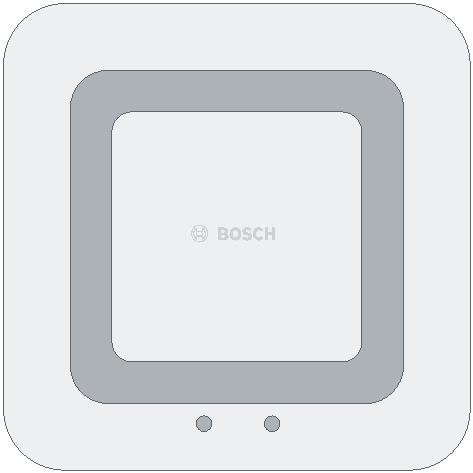
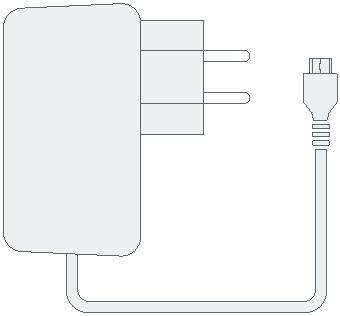
2.0 IN THE BOX 2.1 Gateway

![]()

![]()
![]()
![]()


|
Gateway Power cable Network cable |
2 screws, 2 plugs |
||||||
|
Please check that all products are in the box and are undamaged. Please mount only parts that are in immaculate condition. |
To install the Gateway you will need an internet connection and a standard WiFi router with a free LAN port. |
||||||
14 15
2.2 Twinguard
![]()
![]()


Twinguard Smoke Alarm Mounting bracket 2 screws, 2 plugs
|
Please check that all products are in the box and are undamaged. Please mount only parts that are in immaculate condition. |
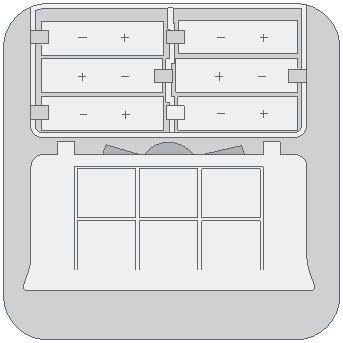
Batteries (6 x 1,5 V AA Alkaline) are already included and can be replaced as necessary. |
16 17
     |
3.0 WARNING NOTICES 3.1 Explanation of symbols |
3.2 Safety instructions |
||||||
|
Warning. This alerts you to danger. |
The Gateway or Twinguard should not be dismantled. Incase of fault, please contact our customer service team on 00800 843 762 78. Please observe the intended use. |
|||||||
|
Info. Indicates important information. |
The product should only be mounted using the material recommended in this manual. Do not paint or wallpaper over any of the devices! |
|||||||
Batteries must not be exposed to excessive heat such as sunlight,fire, etc.
18 19
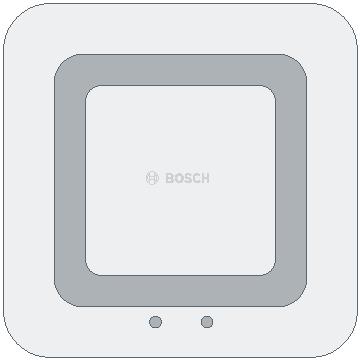
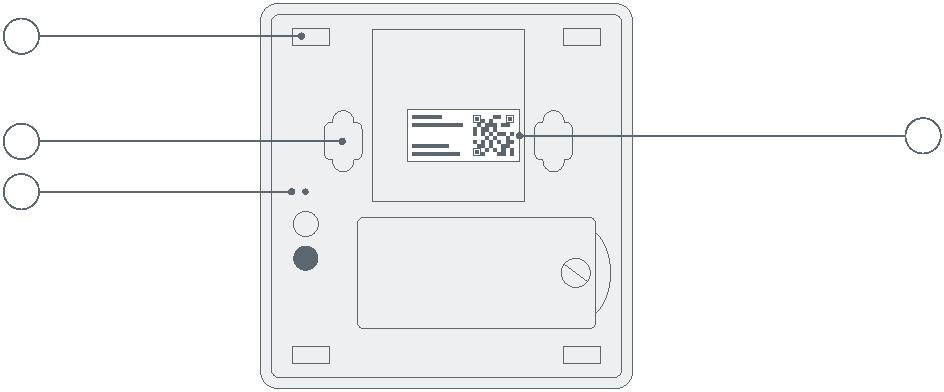
4.0 INDICATORS AND CONTROLS 4.1 Gateway product overview


Item Part Explanation
|
1 2 3 |
1 LED 1 Status indicator for wireless connection 2 LED 2 Status indicator for internet connection 3 LED 3 Activity indicator 4 LED 4 – |
|||
|
4 |
5 LED 5 – |
|||
|
5 |
6 Activation button For activating the Gateway during setup 7 Power connection Port for micro USB power cable 8 LAN port For connecting to the router |
|||
Top view
Rear view
6 7 8
20 21
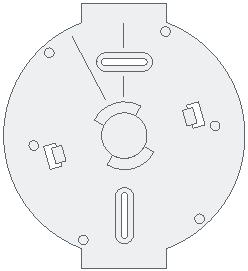
  |
1 |
Item Part Explanation |
1 Rubber pads For providing grip
|
2 3 |
4 |
2 Mounting holes For fitting to the wall 3 Reset button For resetting the Gateway to the factory settings 4 QR code Scan for device identification |
Base
22 23
4.2 Twinguard product overview
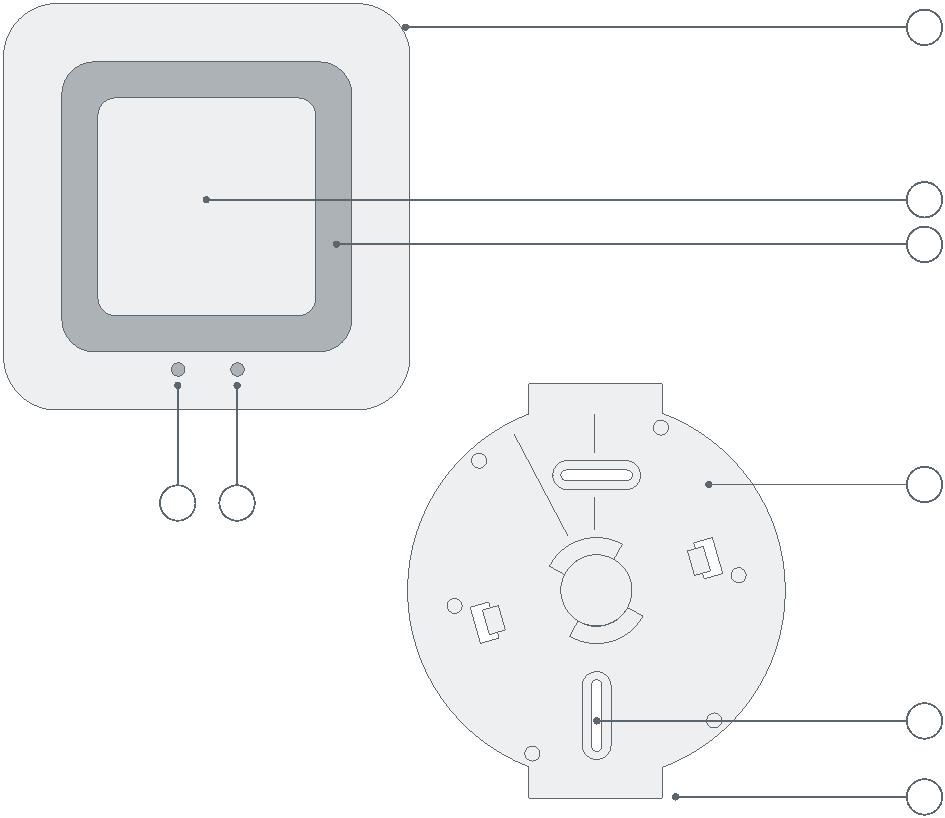

|
1 |
Item Part Explanation |
1 360° LED
light strip For indicating the status: red, orange, green, blue
2 Operating button For accessing and carrying out functions
|
2 |
3 Alarm Audible signal |
|||
|
3 |
4 Alarm LED Red: alarm or fault |
|||
5 Emergency
lighting To ensure safe passage out of the danger zone
6 Mounting bracket For ceiling installation
7 Screw slot For accurate alignment of the alarm
8 Straight edge For aligning the Twinguard with the ceiling level
|
4 5 |
6 |
7
8
24 25
Item Part Explanation
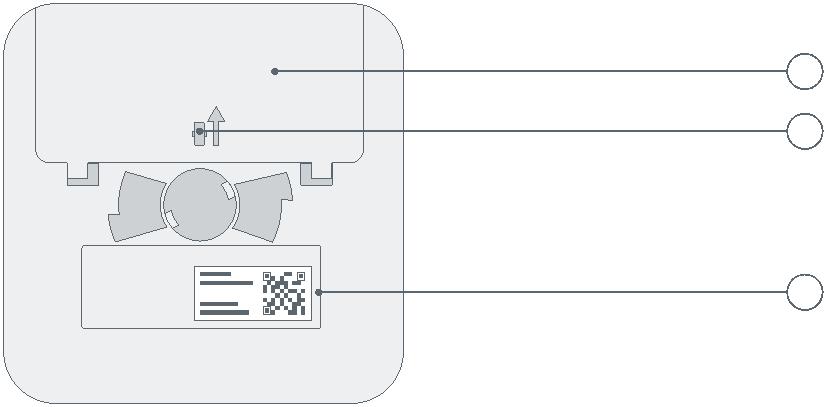


|
1 2 |
1 Battery compartment – 2 Red plastic pin For activating the Twinguard |
3 QR code Scan for device identification
3
Battery compartment canonly be closed when all batteries have been inserted.
26 27
5.0 INSTALLATION AND SET UP THE GATEWAY


Before you start
Make sure that you download the Bosch Twinguard App. You will needit for the entire installation and configuration.
Für Android-Geräte Für Apple iOS-Geräte
|
▶ Load up Google Play ▶ Search for “Bosch Twinguard” ▶ Select the “Bosch Twinguard App” ▶ Tap “Install” |
▶ Load up the App Store ▶ Search for “Bosch Twinguard” ▶ Select the “Bosch Twinguard App” ▶ Tap “Get” |
Connect your Mobile device to thesame WiFi network that you are goingto connect your Gateway to.
28 29
5.1 Starting the Bosch Twinguard App


There must be a functions Wireless network and internet connectionin order for warnings to be sent in the event of a potential fire. RobertBosch Smart Home GmbH are not able to offer a guarantee on the timeit will take for this notification to be transmitted.
Please note that the emergency services number stored in the Appwill not be automatically called if the Twinguard Smoke Alarm detectssmoke. If necessary, you always have to call the emergency servicesyourself!
|
Now start the Bosch Twinguard App and log in using your username and password under “Login”. If you do not |
have a Bosch Account, you can create one using the app. |
You need to ensure that your mobile device is on and connected to a mobile communications network in order for it to receive warnings and notifications from the Twinguard Smoke Alarm. |
You can also use your Bosch Account for other Bosch devices you wantto interconnnect in a network. If you already have a Bosch Account foranother service, you can use it to log in directly.
From this point, the app guides you through the installation process.You will find a detailed description in this instruction manual.
30 31
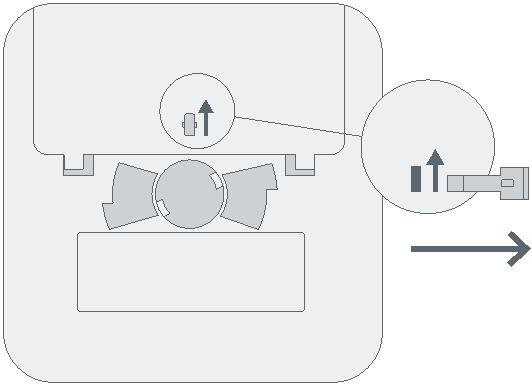
5.2 Set up the Gateway

|
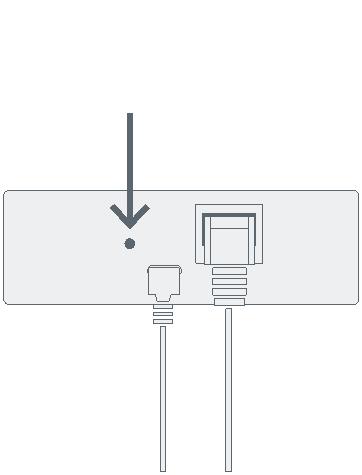
Insert the network cable into the Gateway and into a free LAN port on your router. |
Connect the Gateway to the power supply using the USB power cable and follow the instructions in the app. |
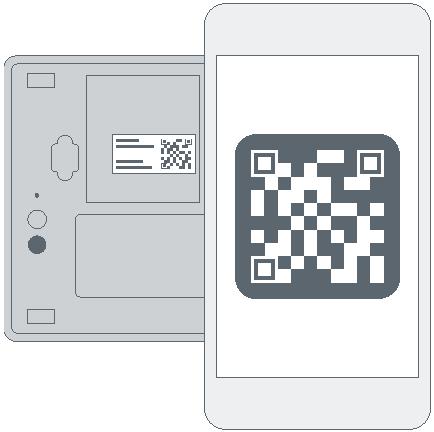
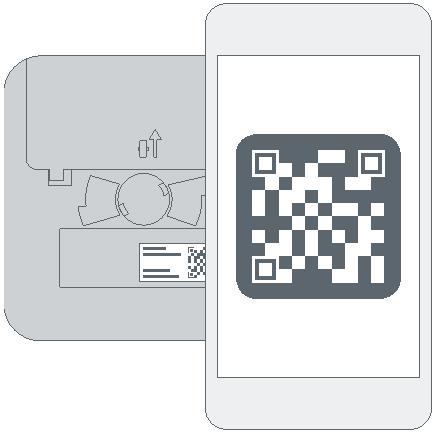
When prompted to do so by the app, please scan the QR code on the base of the Gateway. |
32 33
   |
5.3 Activating the Gateway 6.0 INSTALLATION AND SET UP THE TWINGUARD |
In order to set up the Twinguard, your mobile device must be connect-ed to the WiFi network that your Gateway is already connected to.
|
The app will prompt you to activate the Gateway. To do so, please press the activation button directly next |
to the cable ports on the back of the Gateway once. |
Follow the instructions in the Bosch Twinguard App to add more Smoke Alarms. |
This will require scanning the QR code found on the back of each Smoke Alarm. |
34 35
    |
6.1 Activating the Twinguard |
7.0 FIXING THE GATEWAY 7.1 Mounting instructions |
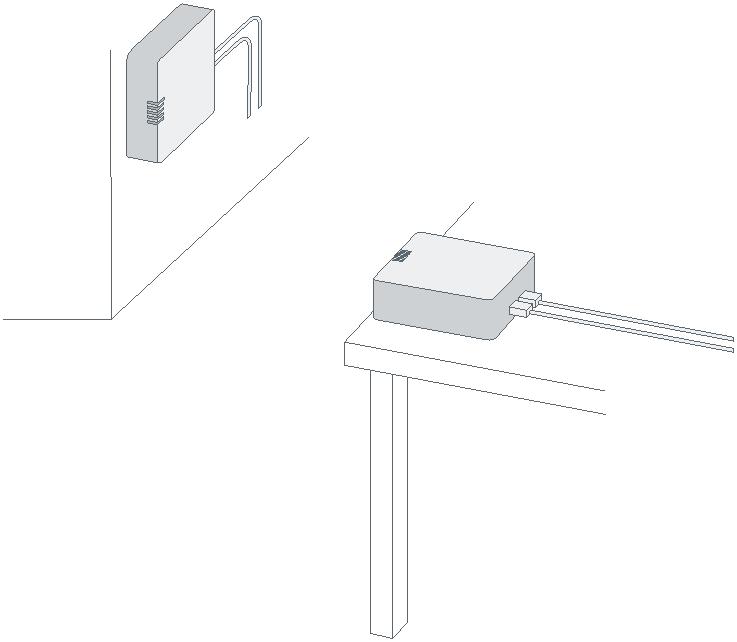
Ensure the Gateway is installed in a location that provides a good connection between it and the Gateway. If the connection is lost,notifications cannot be sent.
When prompted by the app, activate The Gateway can be used lying flat or the Twinguard Smoke Alarm by remov- mounted on the wall. The Gatewaying the red pin on the back. should be positioned as close to the center of the house as possible in
order to ensure optimum wireless coverage.
The Twinguard will become operational when the red pin has been ▶ Check that the scope of delivery isremoved. Please note that inadvertently pressing the operating button intact (see chapter 2.0). Only mountwill trigger a test alarm. parts that are in immaculate condition
36 37
7.2 Wall mounting
![]()
![]()
![]()

When choosing a mounting location and when drilling, pay attention topotential electrical cables and/or supply lines that could be behind thewall.
Top
Base
|
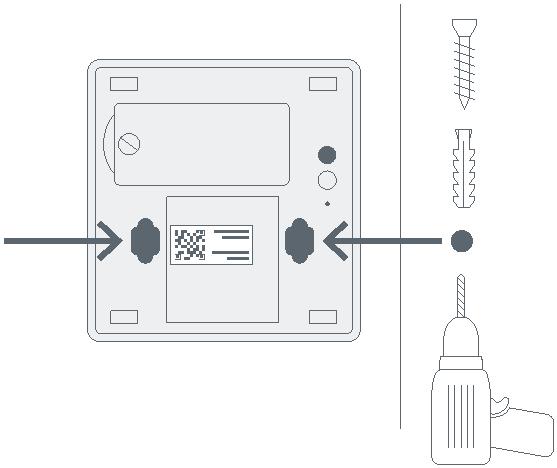
On the base of the Gateway there are two recesses for the screw heads, which enable the Gateway to be fitted |
to the wall. Please use the enclosed plugs and screws to mount it if re- quired. |
▶ Mark two hole positions 4.8 cm apart at the desired position on your wall ▶ Drill the holes and insert the plugs |
▶ Drive the screws into the plugs ▶ Position the Gateway over the screws and slide down until it locks into place |
38 39
8.0 MOUNTING THE TWINGUARD 8.1 Mounting instructions
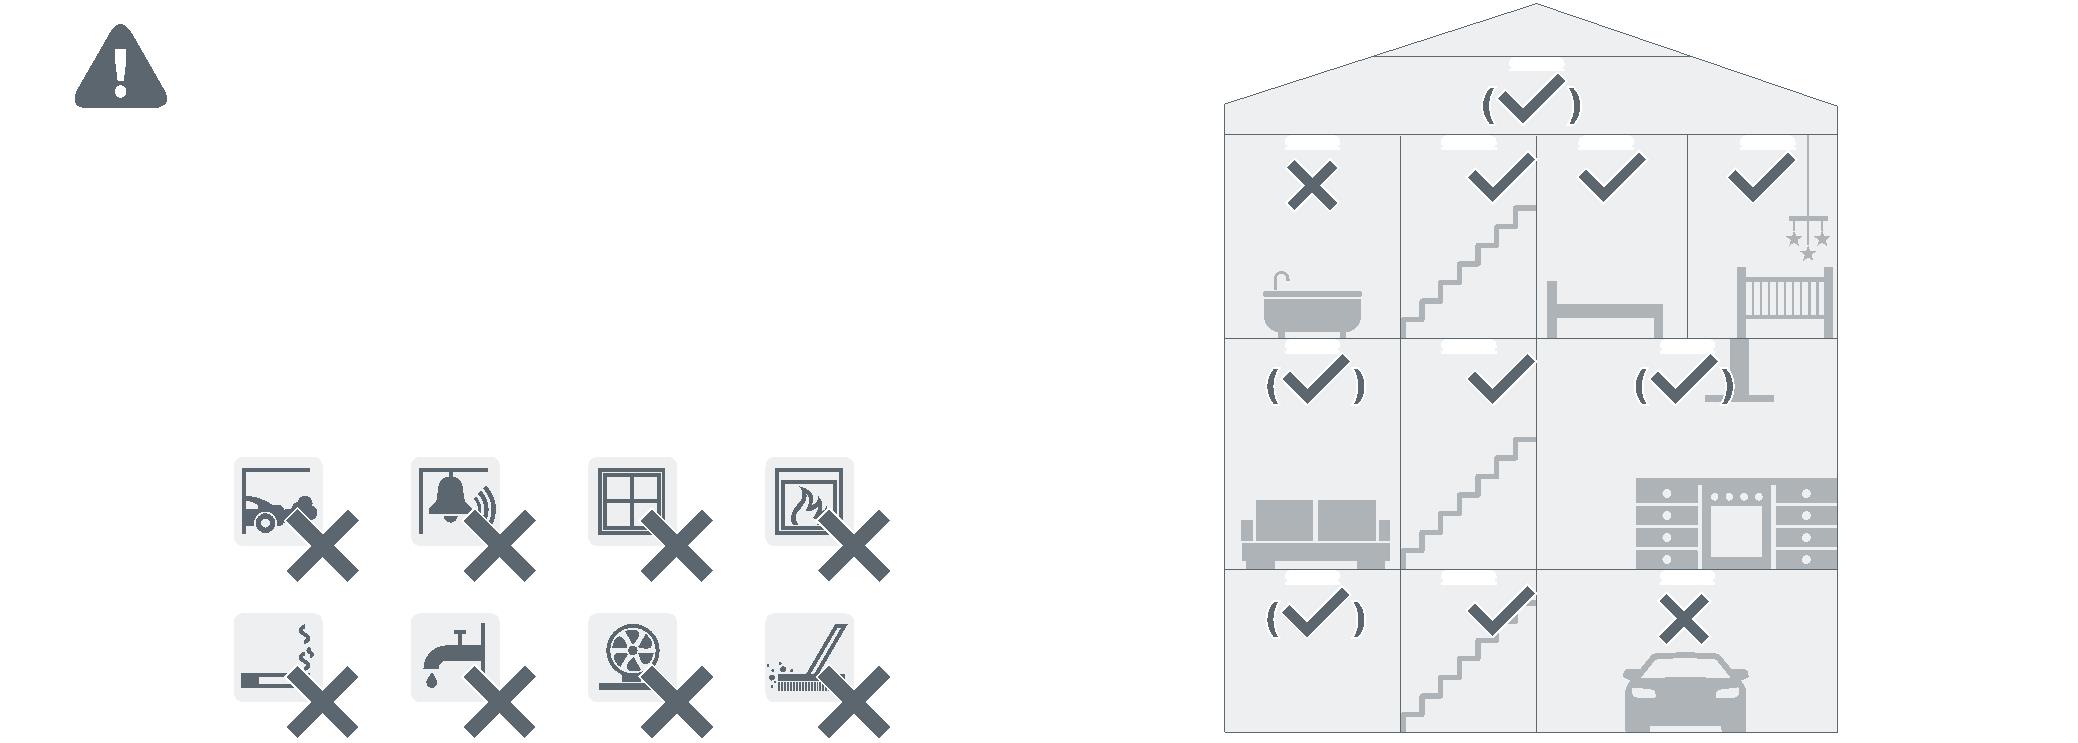


It is best practice to install several smoke alarms in your home to befully protected. As a minimum we recommend that they are installed inevery Bedroom, Kids room and in all hallways that serve as an escaperoute. For the maximum effectiveness we recommend that additionalsmoke alarms should be installed in living areas, attics and basements.
Optimum protection
Yes
No
40 41
> 1m
![]()
|
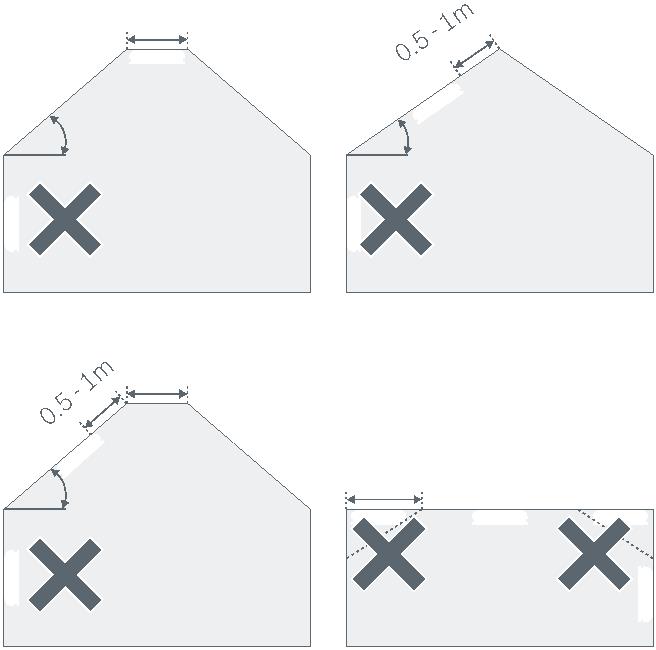
> 20° > 20° |
The Smoke Alarm should be mounted on the ceiling, its important to note certain factors when choosing the best position. |
|||||||
|
> 1m > 20° |
0.5m |
▶ Mount the device in the center of the ceiling. The maximum monitoring area of an alarm is 60 m2. In large rooms, an extra alarm should be fitted for every 60 m2. The maximum height a smoke alarm should be installed is 6 m ▶ If being installed in Hallways (maxi- mum 3 m wide), a smoke alarm must be installed at least every 15 m along the length of the hallway. There should be no more that 7.5 m from a smoke alarm and the end of the hallway. We recommend that a smoke alarm is installed at all hall- way junctions and corners |
▶ In rooms that are divided into multiple floors, it is recommended that a smoke detector is installed on each level where the ceiling area is greater than 16 m², and the length and width is over 2 m. ▶ If your ceiling is split by beams or joints that protrude greater that 0.2 m, we recommend that multiple Smoke Alarms are fitted if the ceiling area created by the beams is greater than 36 m2 |
|||||
42 43
In order to prevent injury, the mounting instructions in this instructionmanual must be followed and the general safety regulations observed.
![]()


When choosing a mounting location and when drilling, pay attentionto potential electrical cables and/or supply lines that could be behindthe wall.
The kit includes two 3.5 x 30 mm countersunk cross-head screws andtwo 5 mm universal wall plugs, which are suitable for fitting to concreteceilings.
Align the straight edge of the mounting bracket parallel to the ceilingedge of the desired room so the Smoke Alarm is parallel to the edge ofthe room.
44 45
8.2 Fixing with screws
![]()
![]()
![]()
![]()
![]()
![]()

“Click”
|
▶ Hold the mounting bracket in the desired position ▶ Mark the drill holes |
▶ Drill the holes and insert the plugs ▶ Position the mounting bracket and- screw it on |
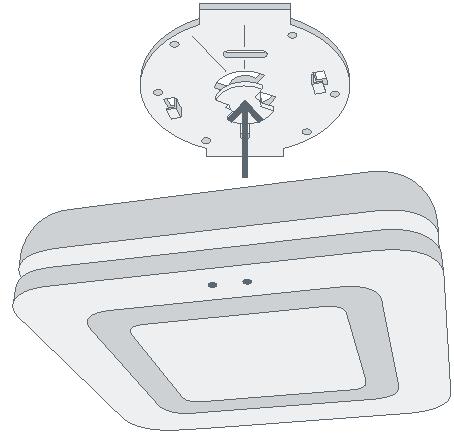
▶ Now fit the Smoke Alarm to the mounting bracket, align and rotate in the direction of the arrows |
▶ When you hear a “Click” your Twinguard is mounted correctly |
46 47
9.0 MAINTENANCE INSTRUCTIONS 9.1 Visual inspection

|
We recommend you inspect and test your Twinguard on a monthly basis. |
▶ The smoke inlet openings along the 360° light strip and the sound outlets are not clogged (e.g. by dust, dirt or paint) ▶ If necessary, clean the Smoke Alarm carefully with a damp cloth |
▶ Check for any damage and that the bracket is still firmly fixed in place. ▶ Ensure that there is a clear space of 0.5 m around your Twinguard so smoke detection is not hindered |
48 49
9.2 Twinguard functional test


We recommend that you test your Twinguard immediately followinginstallation and every month following that. It should also be checkedfollowing every battery change and software update.
If the signals described do not appear, the Smoke Alarm is faulty:Please replace the product in this case.
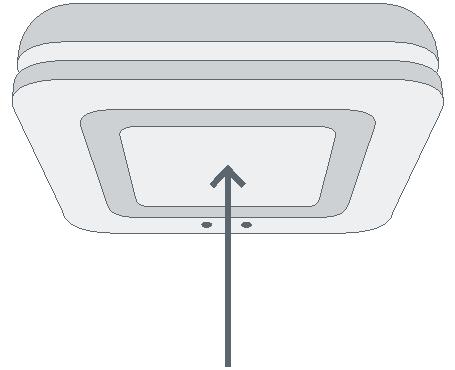
Always press the Smoke Alarm’s operating button in the center atthe height of the Bosch logo.
|
▶ To do this, briefly press the oper- ating button. The alarm will sound three times at a reduced volume, the alarm LED and the LED light strip will flash red and the emergency lighting will turn on |
▶ If the functional test was success- ful, the 360° LED light strip will light up blue for one second |
By initiating a test or muting an alarm using the operating button fire de- tection is deactivated for the next 10 |
minutes. It initiated or muted using the APP, detection remains active. |
50 51
    |
10.0 ALARM AND TROUBLESHOOTING 10.1 Gateway faults |
10.2 Twinguard faults |
||||||||||||||||||||||||||||||||||||||
|
Visual signal Cause Measure |
Audible signal |
Visual signal Cause Measure |
||||||||||||||||||||||||||||||||||||||
|
No LED is lit up |
USB power cable not connected / power cable faulty / Gateway faulty |
Check the power supply to the power cable; replace the power cable or Gateway if necessary |
Quiet signal, every 43 s |
Yellow LED flashes 3 times every 43 s |
Alarm faulty Replace the Alarm |
|||||||||||||||||||||||||||||||||||
|
LED 2 is lit up orange LED 2 is lit up red |
Internet connection not available; Cloud not available Internet connection not available; Cloud not available |
Call the hotline Check the connection between the Gateway and the DSL router or check the internet connection of the DSL router |
Quiet signal, every 300 s Quiet signal, sounds every hour |
Yellow LED flashes once every 300 s – |
Batteries nearly empty Replace the batteries
|
|||||||||||||||||||||||||||||||||||
|
In normal operation, LED 1 and LED 2 of the Gateway are continuously lit up green. LEDs 3, 4 and 5 are inactive in this case. |
Flash and fault codes, information about how to reset the Twinguard to its factory settings plus much more can be found in the online FAQs at www.bosch-smarthome.com/faq |
|||||||||||||||||||||||||||||||||||||||
52 53
  |
10.3 Switching off the Smoke Alarm |
11.0 PRODUCT DETAILS 11.1 Technical data |
||||||||||
|
If the alarm is triggered, please press the operating button in the center of the Smoke Alarm to mute it. |
Alternatively you can silence the alarm using the Twinguard App. |
Model name of Gateway FRS-Gateway Rated voltage 5VDC
|
||||||||||
|
If the operating button is used to initiate the functional test or switch off an alarm, both fire detection and the alarm is deactivated for 10 minutes. |
Connections USB power cable, LAN (Ethernet, RJ45) Type of protection IP20 Ambient temperature 5°C to 40°C |
|||||||||||
Storage temperature -20°C to 70°C
Maximum humidity 15% to 85%
Radio frequency 2,4 GHZ ISM-Band
Max. transmission power 8 dBm
Radio range in free-field conditions ≥ 100 m
Casing dimensions (W × H × D) 88 mm x 90 mm x 29 mm
Weight 110 g
54 55
11.2 Declaration of conformity


|
Model name of Twinguard FRS-5000-OW-EN Rated voltage 6 x 1.5V AA alkaline batteries (replaceable) Battery manufacturer type Duracell / Panasonic Battery life 2 years (typical) Type of protection IP20 Ambient temperature 5°C to 30°C Storage temperature -5°C to 30°C Maximum humidity 93% non-condensing Radio frequency 2,4 GHZ ISM band Max. transmission power 8 dBm Radio range in free-field conditions ≥ 100 m |
Robert Bosch Smart Home GmbH hereby declares that the Bosch Smart Home Twinguard Smoke Alarm and Bosch Smart Home Gateway radio communication unit complies with Directive 1999/5/EC and is designed for use in all countries of the European Union. |
The declaration of conformity and declaration of performance can be downloaded from www.bosch-smarthome.com |
||||||
|
Maximum number of connections to one Gateway |
40 |
|||||||
Volume at a distance of 3 m > 85 dB(A)
Casing dimensions (W × H × D) 138 mm x 138 mm x 41 mm
Weight 440 g
56 57
11.3 Faults in radio operation
|
Faults in radio operation (e.g. due to electric motors or defective elec- trical devices) cannot be ruled out. The radio range inside buildings may differ greatly from the radio range in free-field conditions. Apart from the 11.4 Open-Source-Software |
transmission power and the receiver characteristics, environmental influ- ences such as humidity and structural characteristics may also influence radio operation. |
Contiki Open Source License: Copyright (c) 2003, Adam Dunkels. Copyright (c) 2004-2005,2008 Swedish Institute of Computer Science. All rights reserved. Redistribution and use in source and binary forms, with or without modification, are permitted provided that the following conditions are met: ▶ Redistributions of source code must retain the above copyright notice, this list of conditions and the following disclaimer. ▶ Redistributions in binary form must reproduce the above copyright notice, this list of conditions and the following disclaimer in the documentation and/or other materials provided with the distribution. ▶ The name of the author may not be used to endorse or promote products derived from this software without specific prior written permission. |
This Bosch Smart Home product uses
open-source software. Below you will THIS SOFTWARE IS PROVIDED BY THE AUTHOR “AS IS” AND ANY EXPRESSfind the license information for the OR IMPLIED WARRANTIES, INCLUDING, BUT NOT LIMITED TO, THE IMPLIEDcomponents used. WARRANTIES OF MERCHANTABILITY AND FITNESS FOR A PARTICULAR PURPOSE ARE DISCLAIMED. IN NO EVENT SHALL THE AUTHOR BE LIABLE
FOR ANY DIRECT, INDIRECT, INCIDENTAL, SPECIAL, EXEMPLARY, OR CON- SEQUENTIAL DAMAGES (INCLUDING, BUT NOT LIMITED TO, PROCUREMENT OF SUBSTITUTE GOODS OR SERVICES; LOSS OF USE, DATA, OR PROFITS; OR BUSINESS INTERRUPTION) HOWEVER CAUSED AND ON ANY THEORY OF LIABILITY, WHETHER IN CONTRACT, STRICT LIABILITY, OR TORT (INCLUDING NEGLIGENCE OR OTHERWISE) ARISING IN ANY WAY OUT OF THE USE OF THIS SOFTWARE, EVEN IF ADVISED OF THE POSSIBILITY OF SUCH DAMAGE.
58 59
11.5 Environmental protection and disposal
![]()

|
ARM CMSIS Open Source License: Copyright (c) 2009–2014 ARM LIMITED All rights reserved. Redistribution and use in source and binary forms, with or without modification, are permitted provided that the following conditions are met: ▶ Redistributions of source code must retain the above copyright notice, this list of conditions and the following disclaimer. ▶ Redistributions in binary form must reproduce the above copyright notice, this list of conditions and the following disclaimer in the documentation and/or other materials provided with the distribution. ▶ Neither the name of ARM nor the names of its contributors may be used to endorse or promote products derived from this software without specific prior written permission. |
Electrical and electronic equipment that is no longer usable or is defective, or used batteries must be separated from other waste and recycled in an environmentally friendly manner (European Directive on Waste Electrical and Electronic Equipment). To dispose of old electrical and electronic equipment or batteries, use your country-specific return and collection systems. |
Batteries must not be disposed of with household waste. Used batteries must be disposed of in the local collection systems. |
THIS SOFTWARE IS PROVIDED BY THE COPYRIGHT HOLDERS AND CONTRIB-UTORS “AS IS” AND ANY EXPRESS OR IMPLIED WARRANTIES, INCLUDING,BUT NOT LIMITED TO, THE IMPLIED WARRANTIES OF MERCHANTABILITYAND FITNESS FOR A PARTICULAR PURPOSE ARE DISCLAIMED. IN NO EVENTSHALL COPYRIGHT HOLDERS AND CONTRIBUTORS BE LIABLE FOR ANYDIRECT, INDIRECT, INCIDENTAL, SPECIAL, EXEMPLARY, OR CONSEQUENTIALDAMAGES (INCLUDING, BUT NOT LIMITED TO, PROCUREMENT OF SUB-STITUTE GOODS OR SERVICES; LOSS OF USE, DATA, OR PROFITS; ORBUSINESS INTERRUPTION) HOWEVER CAUSED AND ON ANY THEORY OFLIABILITY, WHETHER IN CONTRACT, STRICT LIABILITY, OR TORT (INCLUDINGNEGLIGENCE OR OTHERWISE) ARISING IN ANY WAY OUT OF THE USE OFTHIS SOFTWARE, EVEN IF ADVISED OF THE POSSIBILITY OF SUCH DAMAGE.
60 61
12.0 FURTHER INFORMATION

|
You can find more detailed information on operating and maintaining the Smoke Alarms in the online FAQs at www.bosch-smarthome.com/faq |
You will also find all contact details on the rear side of this document. |
Sale and transfer
Before you transfer or sell your device, delete your personalinformation. To do this, reset the device to its factory settings(see online FAQs).
62 63
#BeSmarter

64
INTERCONNECTED SMART HOME PRODUCTS

Bosch Smart Home offers a range of products to make your lifemore comfortable, safer and more sustainable.
More at www.bosch-smarthome.com
Robert Bosch Smart Home GmbHSchockenriedstraße 17 70565 Stuttgart, Germany

00800 8437 6278 (free for UK)Mon–Fri 7:00 am–8:00 pm Sat 8:00 am–6:00 pm
Twinguard_Starter_Set_EN_160818_web